Create a Cluster Profile
Palette offers profile-based management for Kubernetes, enabling consistency, repeatability, and operational efficiency across multiple clusters. A cluster profile allows you to customize the cluster infrastructure stack, allowing you to choose the desired Operating System (OS), Kubernetes, Container Network Interfaces (CNI), Container Storage Interfaces (CSI). You can further customize the stack with add-on application layers. For more information about cluster profile types, refer to Cluster Profiles.
In this tutorial, you create a full profile directly from the Palette dashboard. Then, you add a layer to your cluster profile by using a community pack to deploy a web application. The concepts you learn about in the Getting Started section are centered around a fictional case study company, Spacetastic Ltd.
🧑🚀 Back at Spacetastic HQ
The team are busy exploring and evaluating Palette. In order to prepare for a migration to any external platform, they begin to map out all the dependencies of their systems and infrastructure.
Wren begins creating the list. "Our tech stack has grown, as we have added features and capabilities. I remember making a lot of design decisions myself, as I was Spacetastic's Founding Engineer. It's really interesting to look back on how much we've built and grown since those days!"
Kai smiles and nods. "It's definitely been an out of this world ride!" they say. "I have a similar feeling when I think about the infrastructure that I built in the early days as Platform Engineer. I will add our infrastructure layers to your list. This process has the added bonus of giving us a chance to review which dependencies need to be updated, so Meera, our security expert, will be happy too."
Prerequisites
- Follow the steps described in the Set up Palette with GCP guide to authenticate Palette for use with your GCP cloud account.
- Ensure that the Palette Community Registry is available in your Palette environment. Refer to the Add OCI Packs Registry guide for additional guidance.
Create a Full Cluster Profile
Log in to Palette and navigate to the left Main Menu. Select Profiles to view the cluster profile page. You can view the list of available cluster profiles. To create a cluster profile, click on Add Cluster Profile.
Follow the wizard to create a new profile.
In the Basic Information section, assign the name gcp-profile, provide a profile description, select the type as Full, and assign the tag env:gcp. You can leave the version empty if you want to. Just be aware that the version defaults to 1.0.0. Click on Next.
Cloud Type allows you to choose the infrastructure provider with which this cluster profile is associated. Select Google Cloud and click on Next.
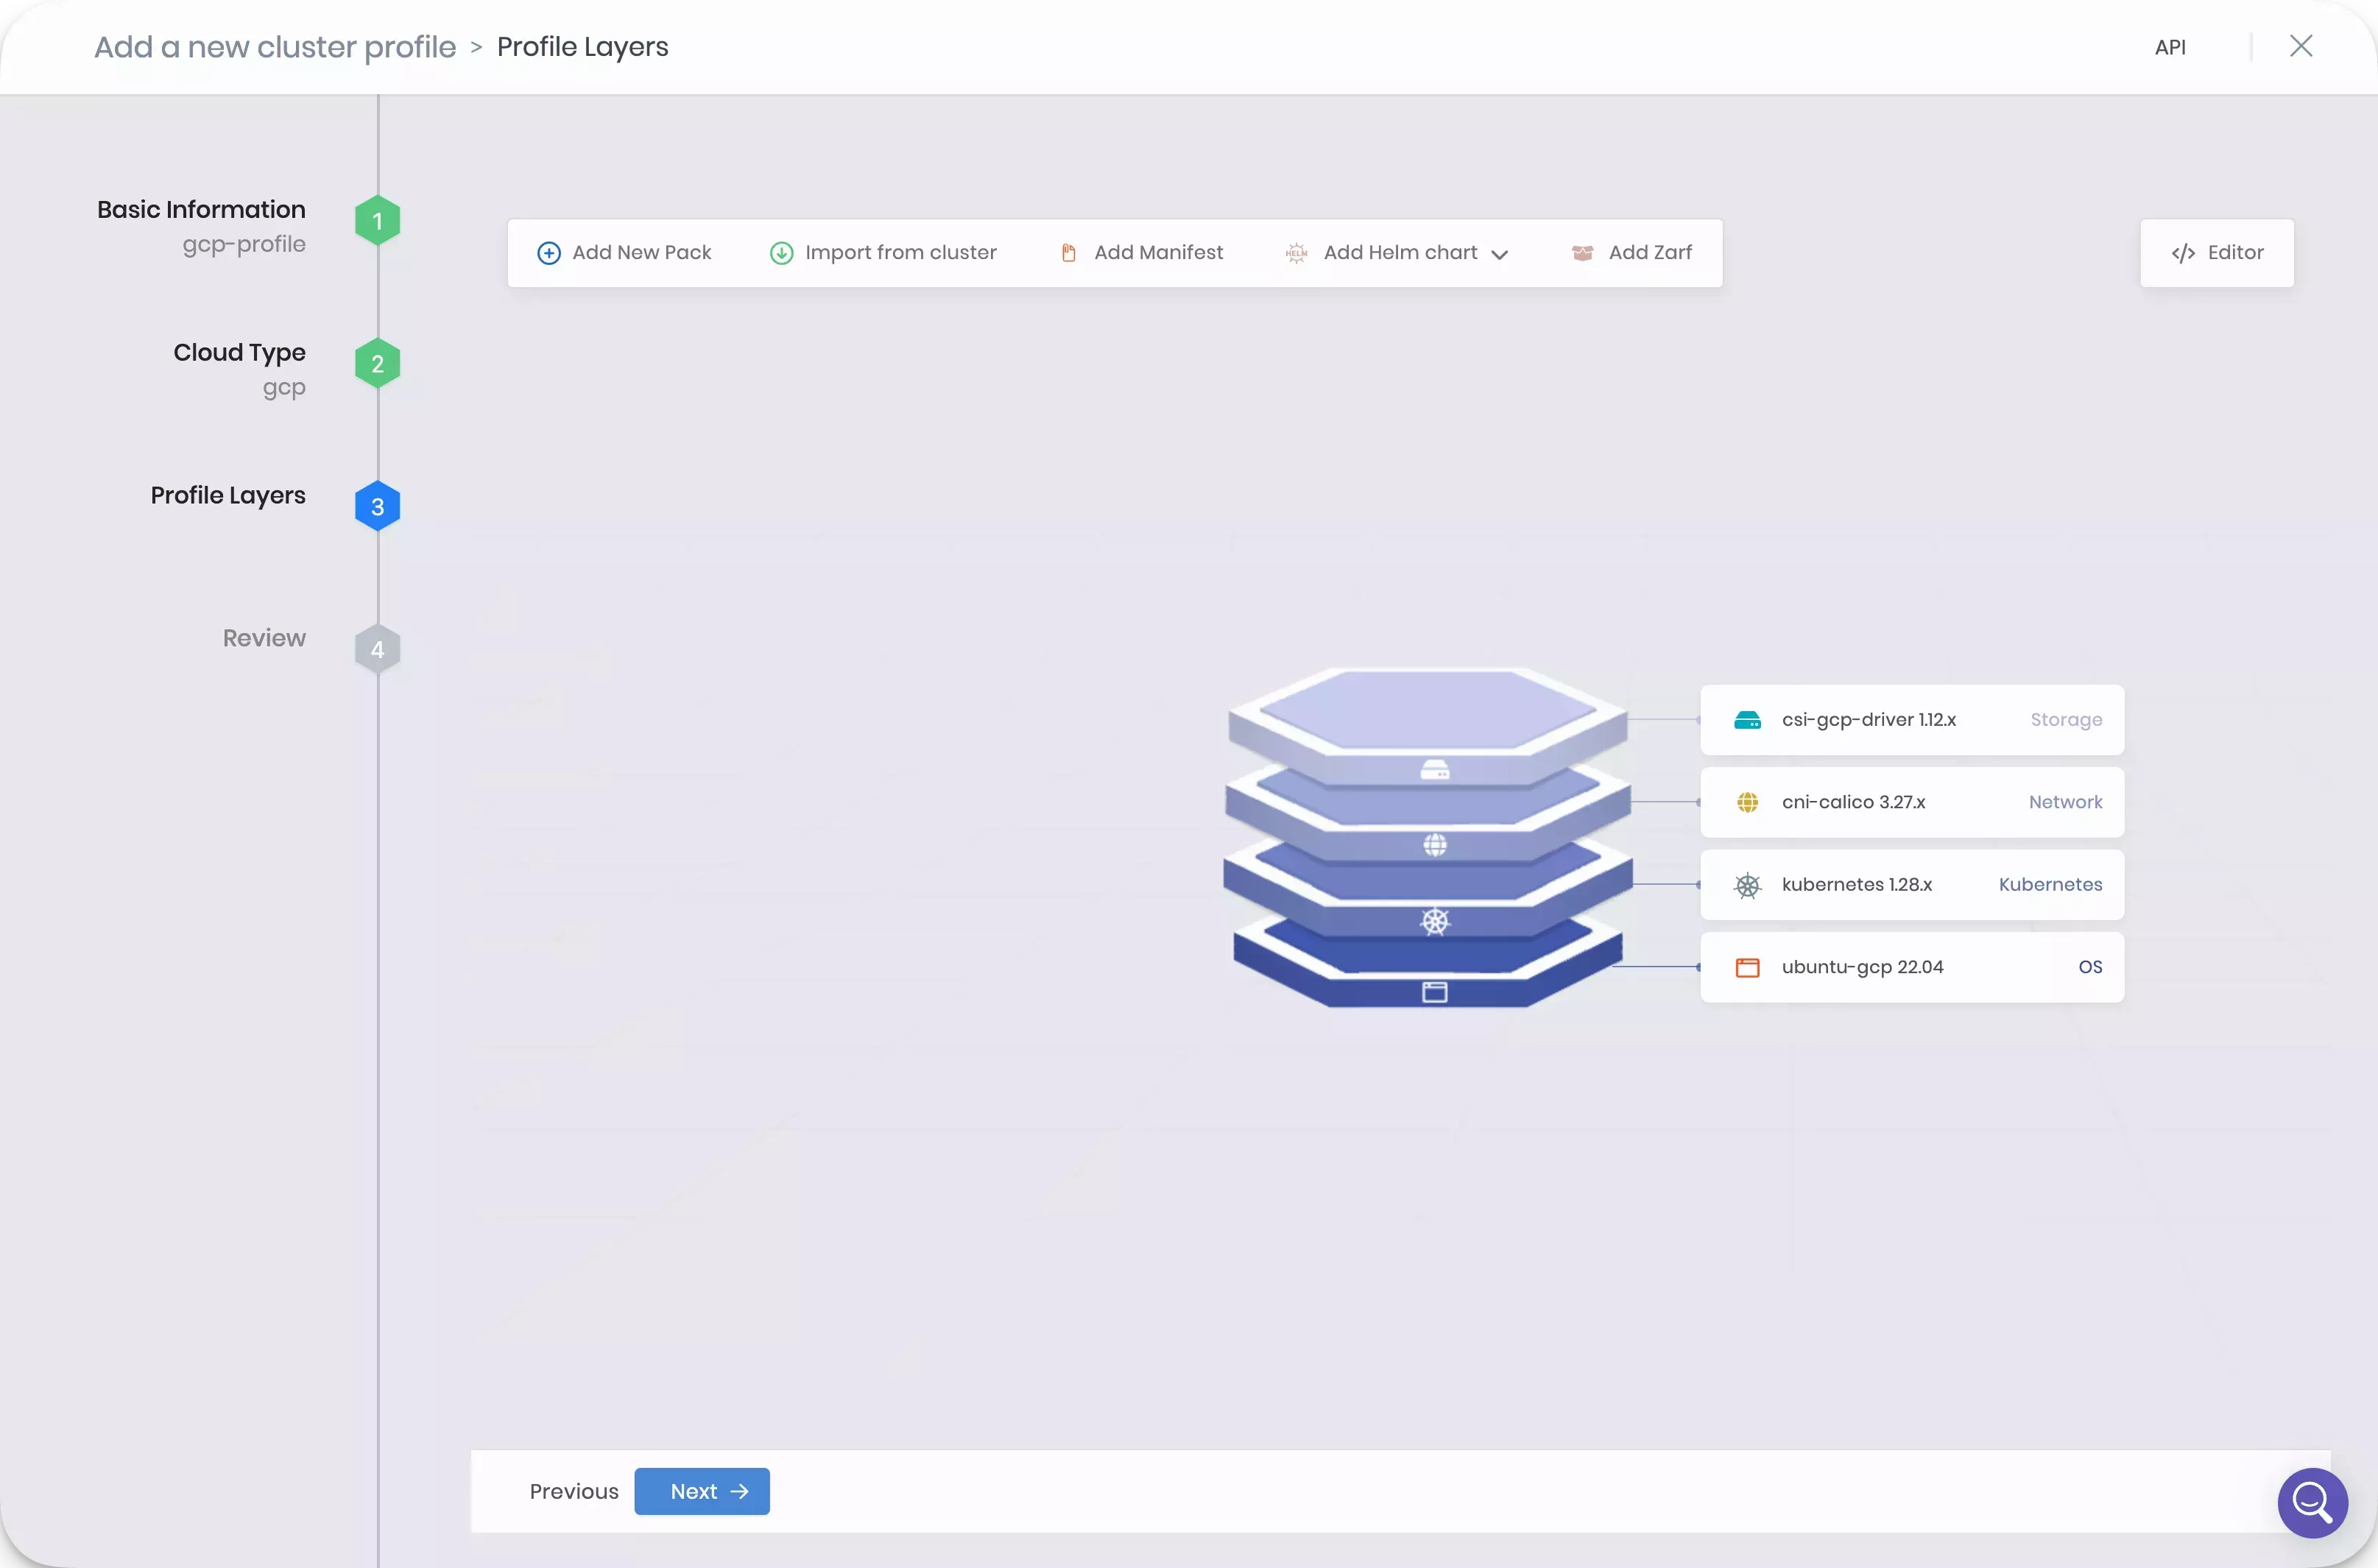
The Profile Layers step is where you specify the packs that compose the profile. There are four required infrastructure packs and several optional add-on packs you can choose from. Every pack requires you to select the Pack Type, Registry, and Pack Name.
For this tutorial, use the following packs:
| Pack Name | Version | Layer |
|---|---|---|
| ubuntu-gcp LTS | 22.4.x | Operating System |
| Kubernetes | 1.28.x | Kubernetes |
| cni-calico | 3.27.x | Network |
| csi-gcp-driver | 1.12.x | Storage |
As you fill out the information for each layer, click on Next to proceed to the next layer.
Click on Confirm after you have completed filling out all the core layers.
The review section gives an overview of the cluster profile configuration you selected. Click on Finish Configuration to create the cluster profile.
Add a Pack
Navigate to the left Main Menu and select Profiles. Select the cluster profile you created earlier.
Click on Add New Pack at the top of the page.
Select the Palette Community Registry from the Registry dropdown. Then, click on the latest Hello Universe pack with version v1.2.0.
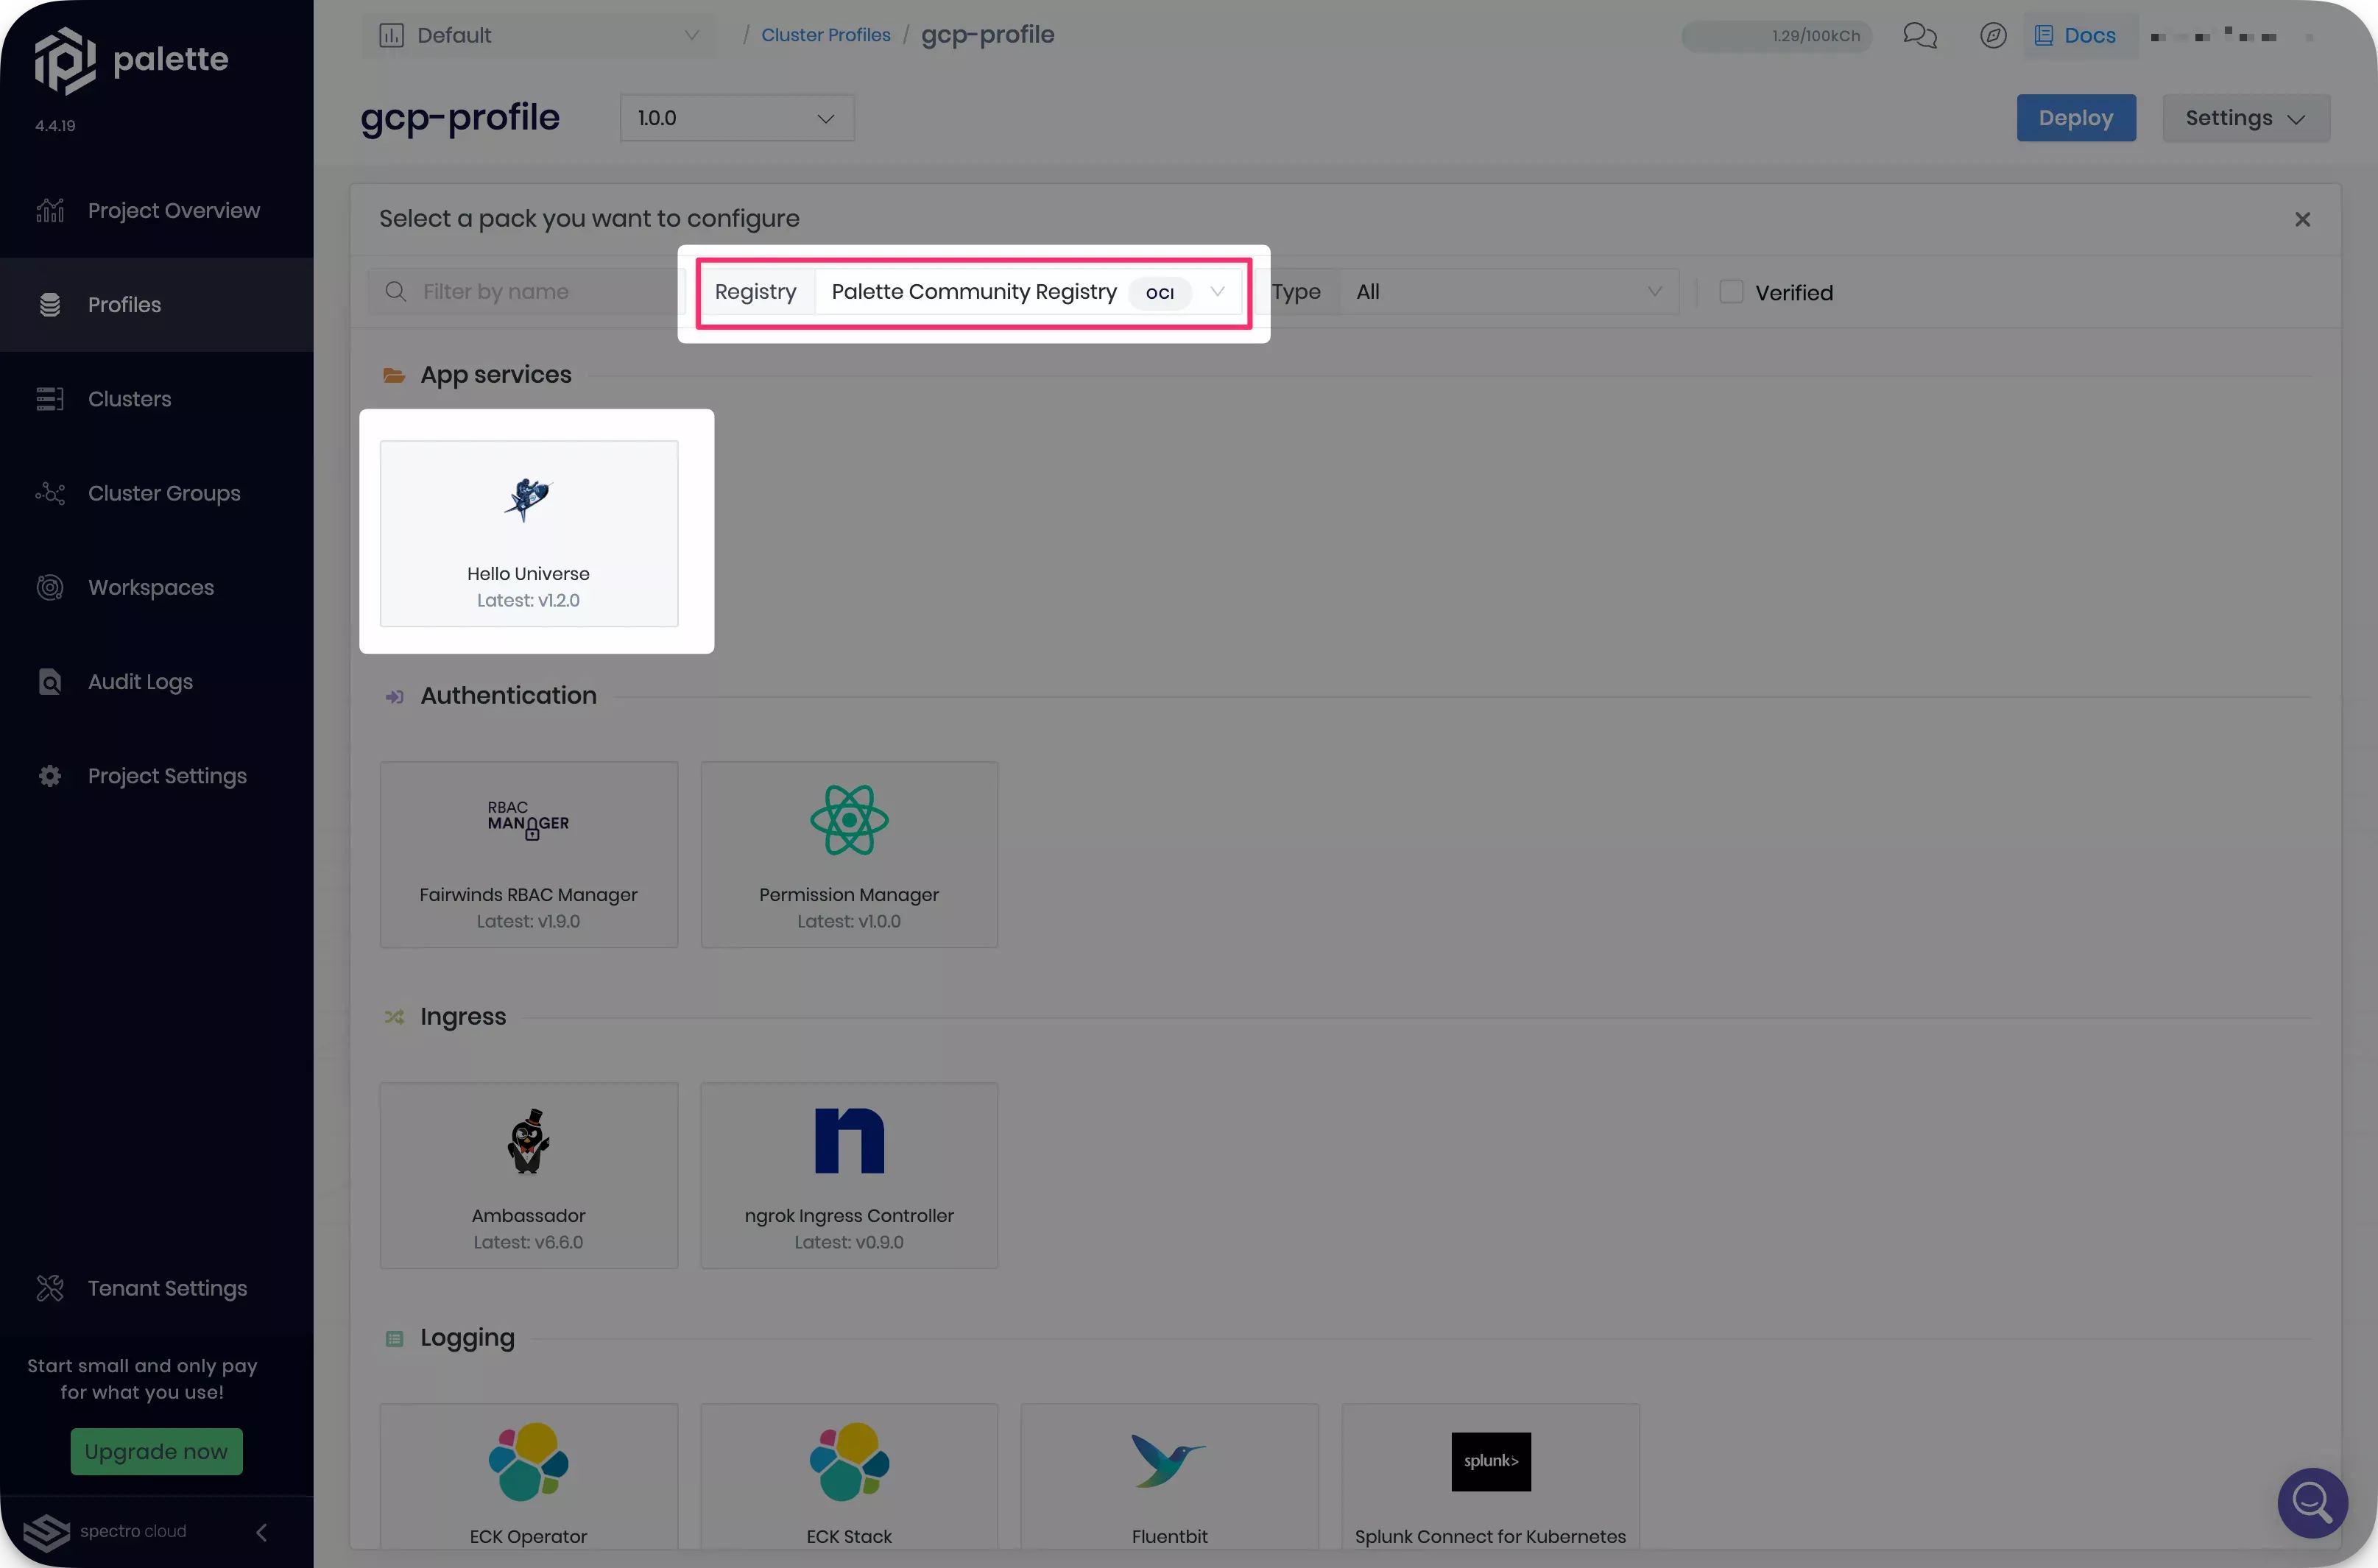
Once you have selected the pack, Palette will display its README, which provides you with additional guidance for usage and configuration options. The pack you added will deploy the hello-universe application.
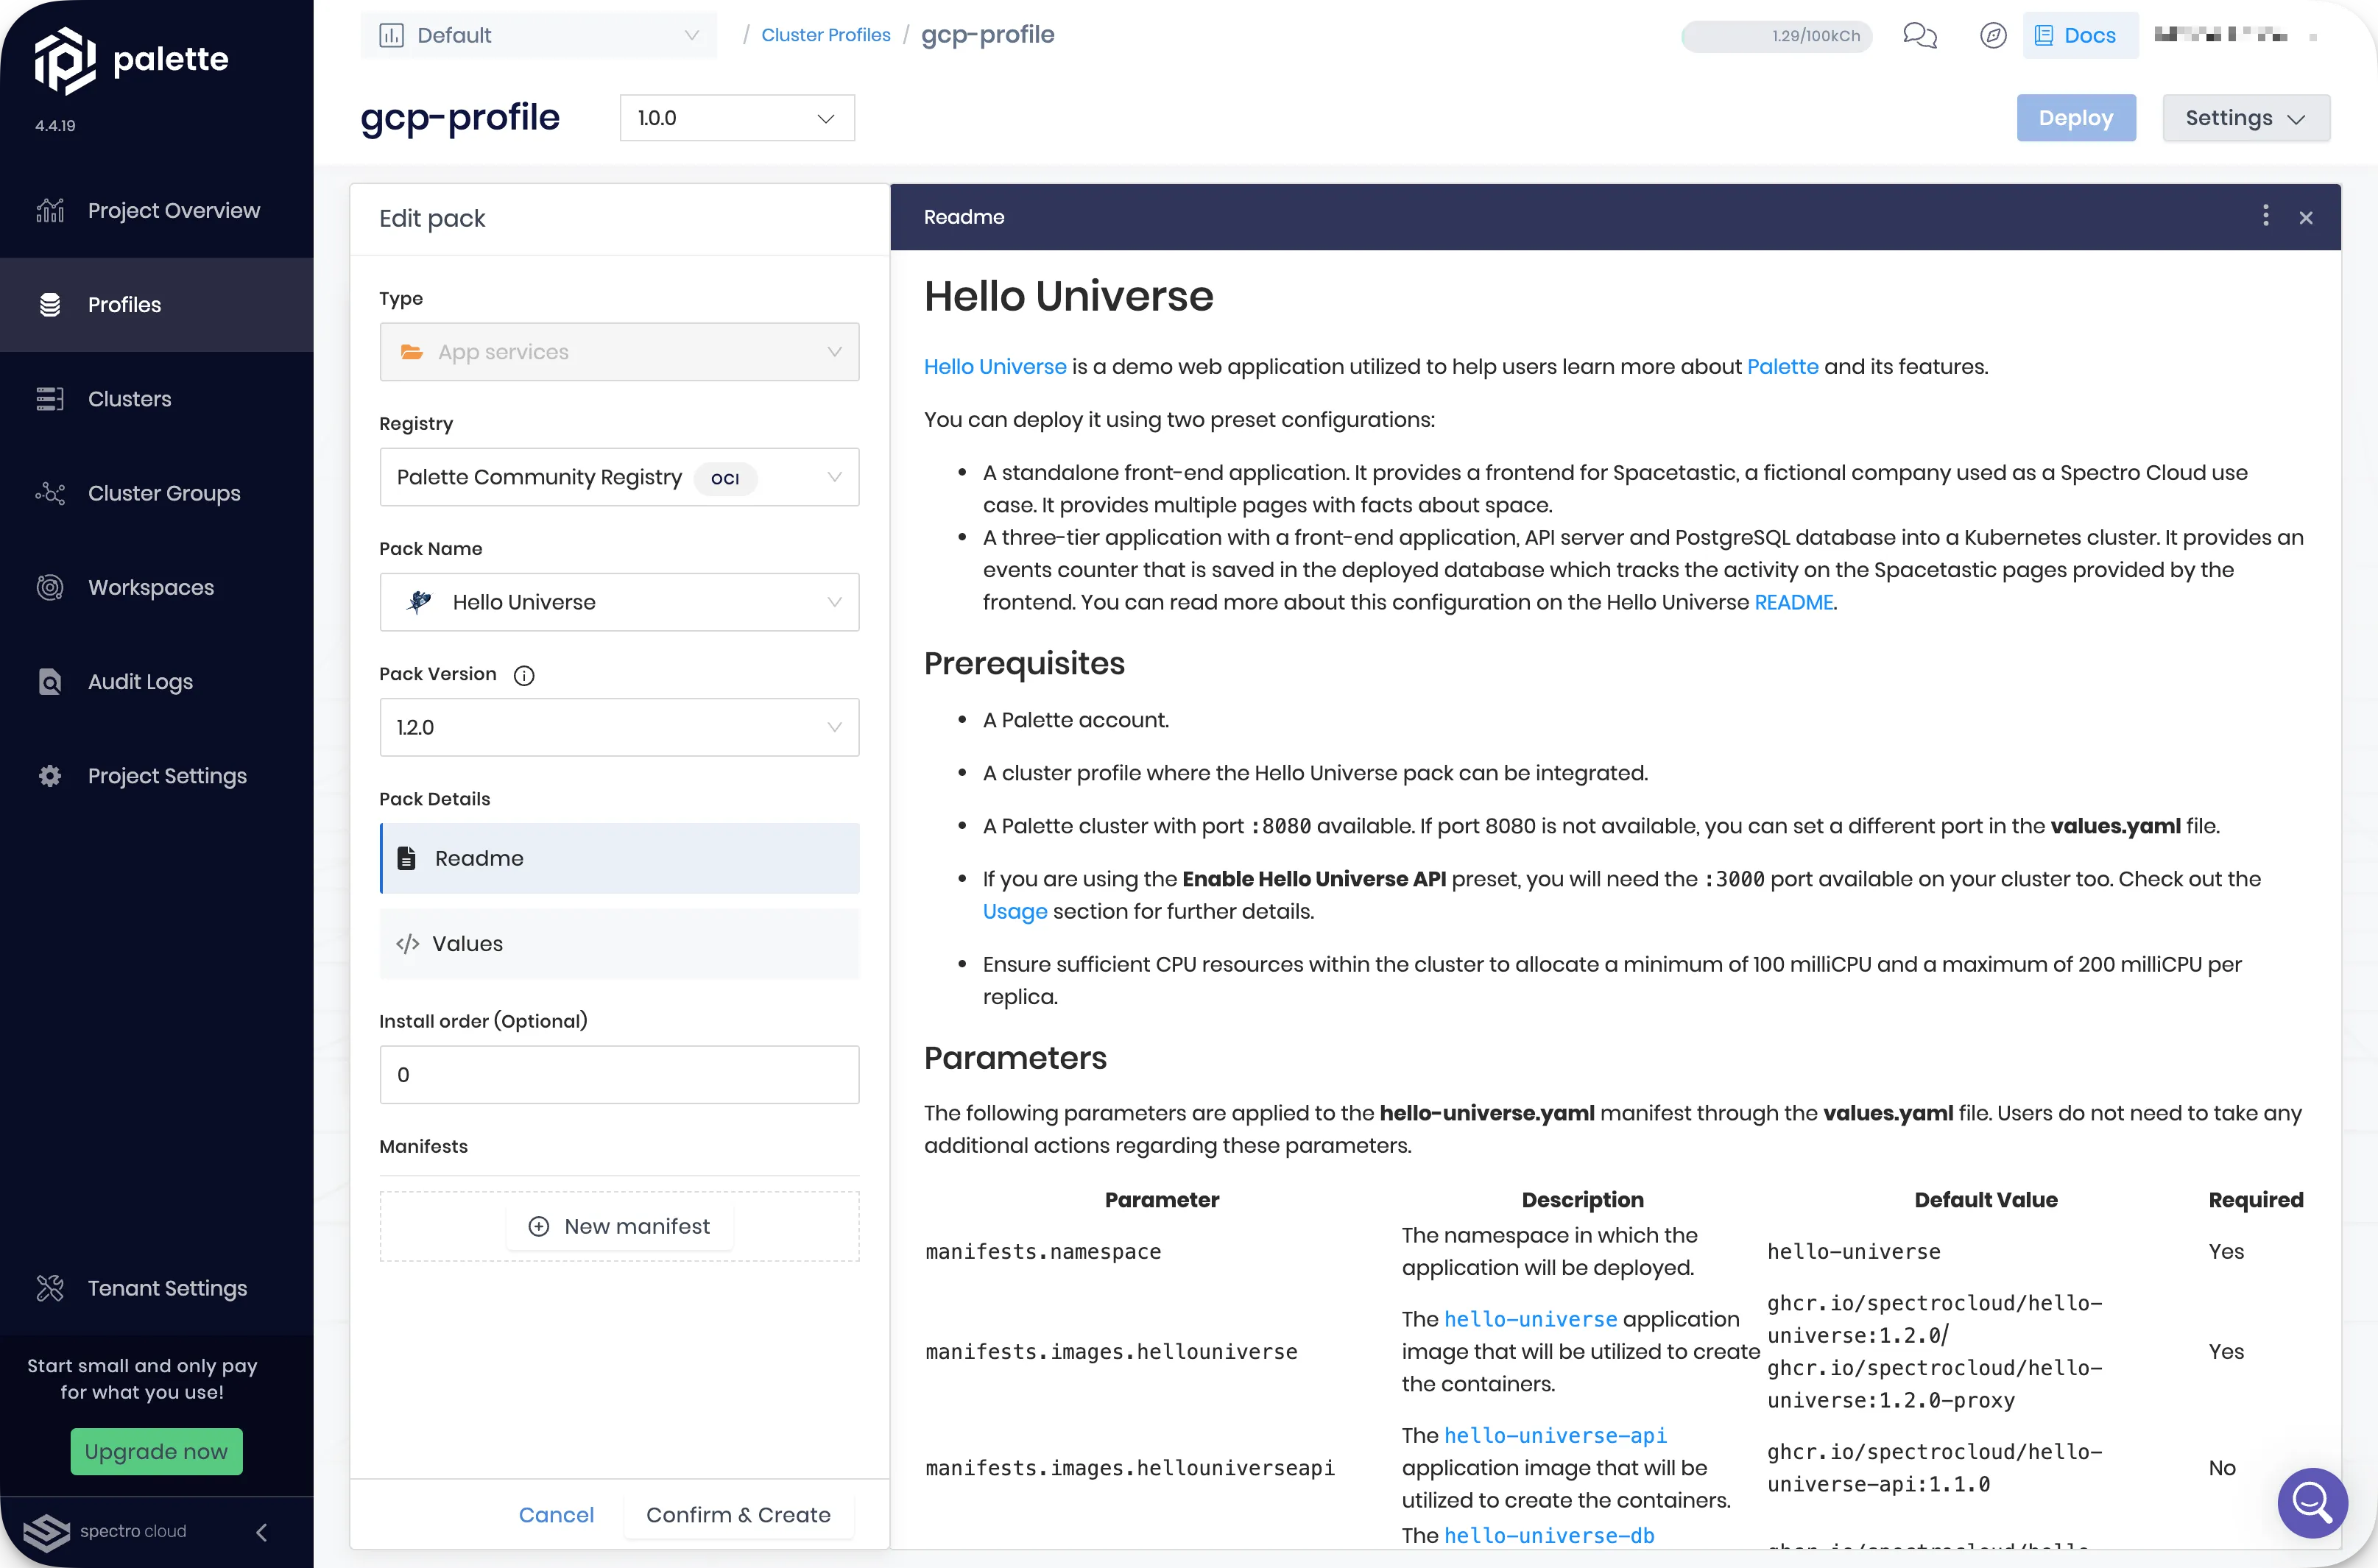
Click on Values to edit the pack manifest. Click on Presets on the right-hand side.
This pack has two configured presets:
- Disable Hello Universe API configures the hello-universe application as a standalone frontend application. This is the default preset selection.
- Enable Hello Universe API configures the hello-universe application as a three-tier application with a frontend, API server, and Postgres database.
Select the Enable Hello Universe API preset. The pack manifest changes according to this preset.
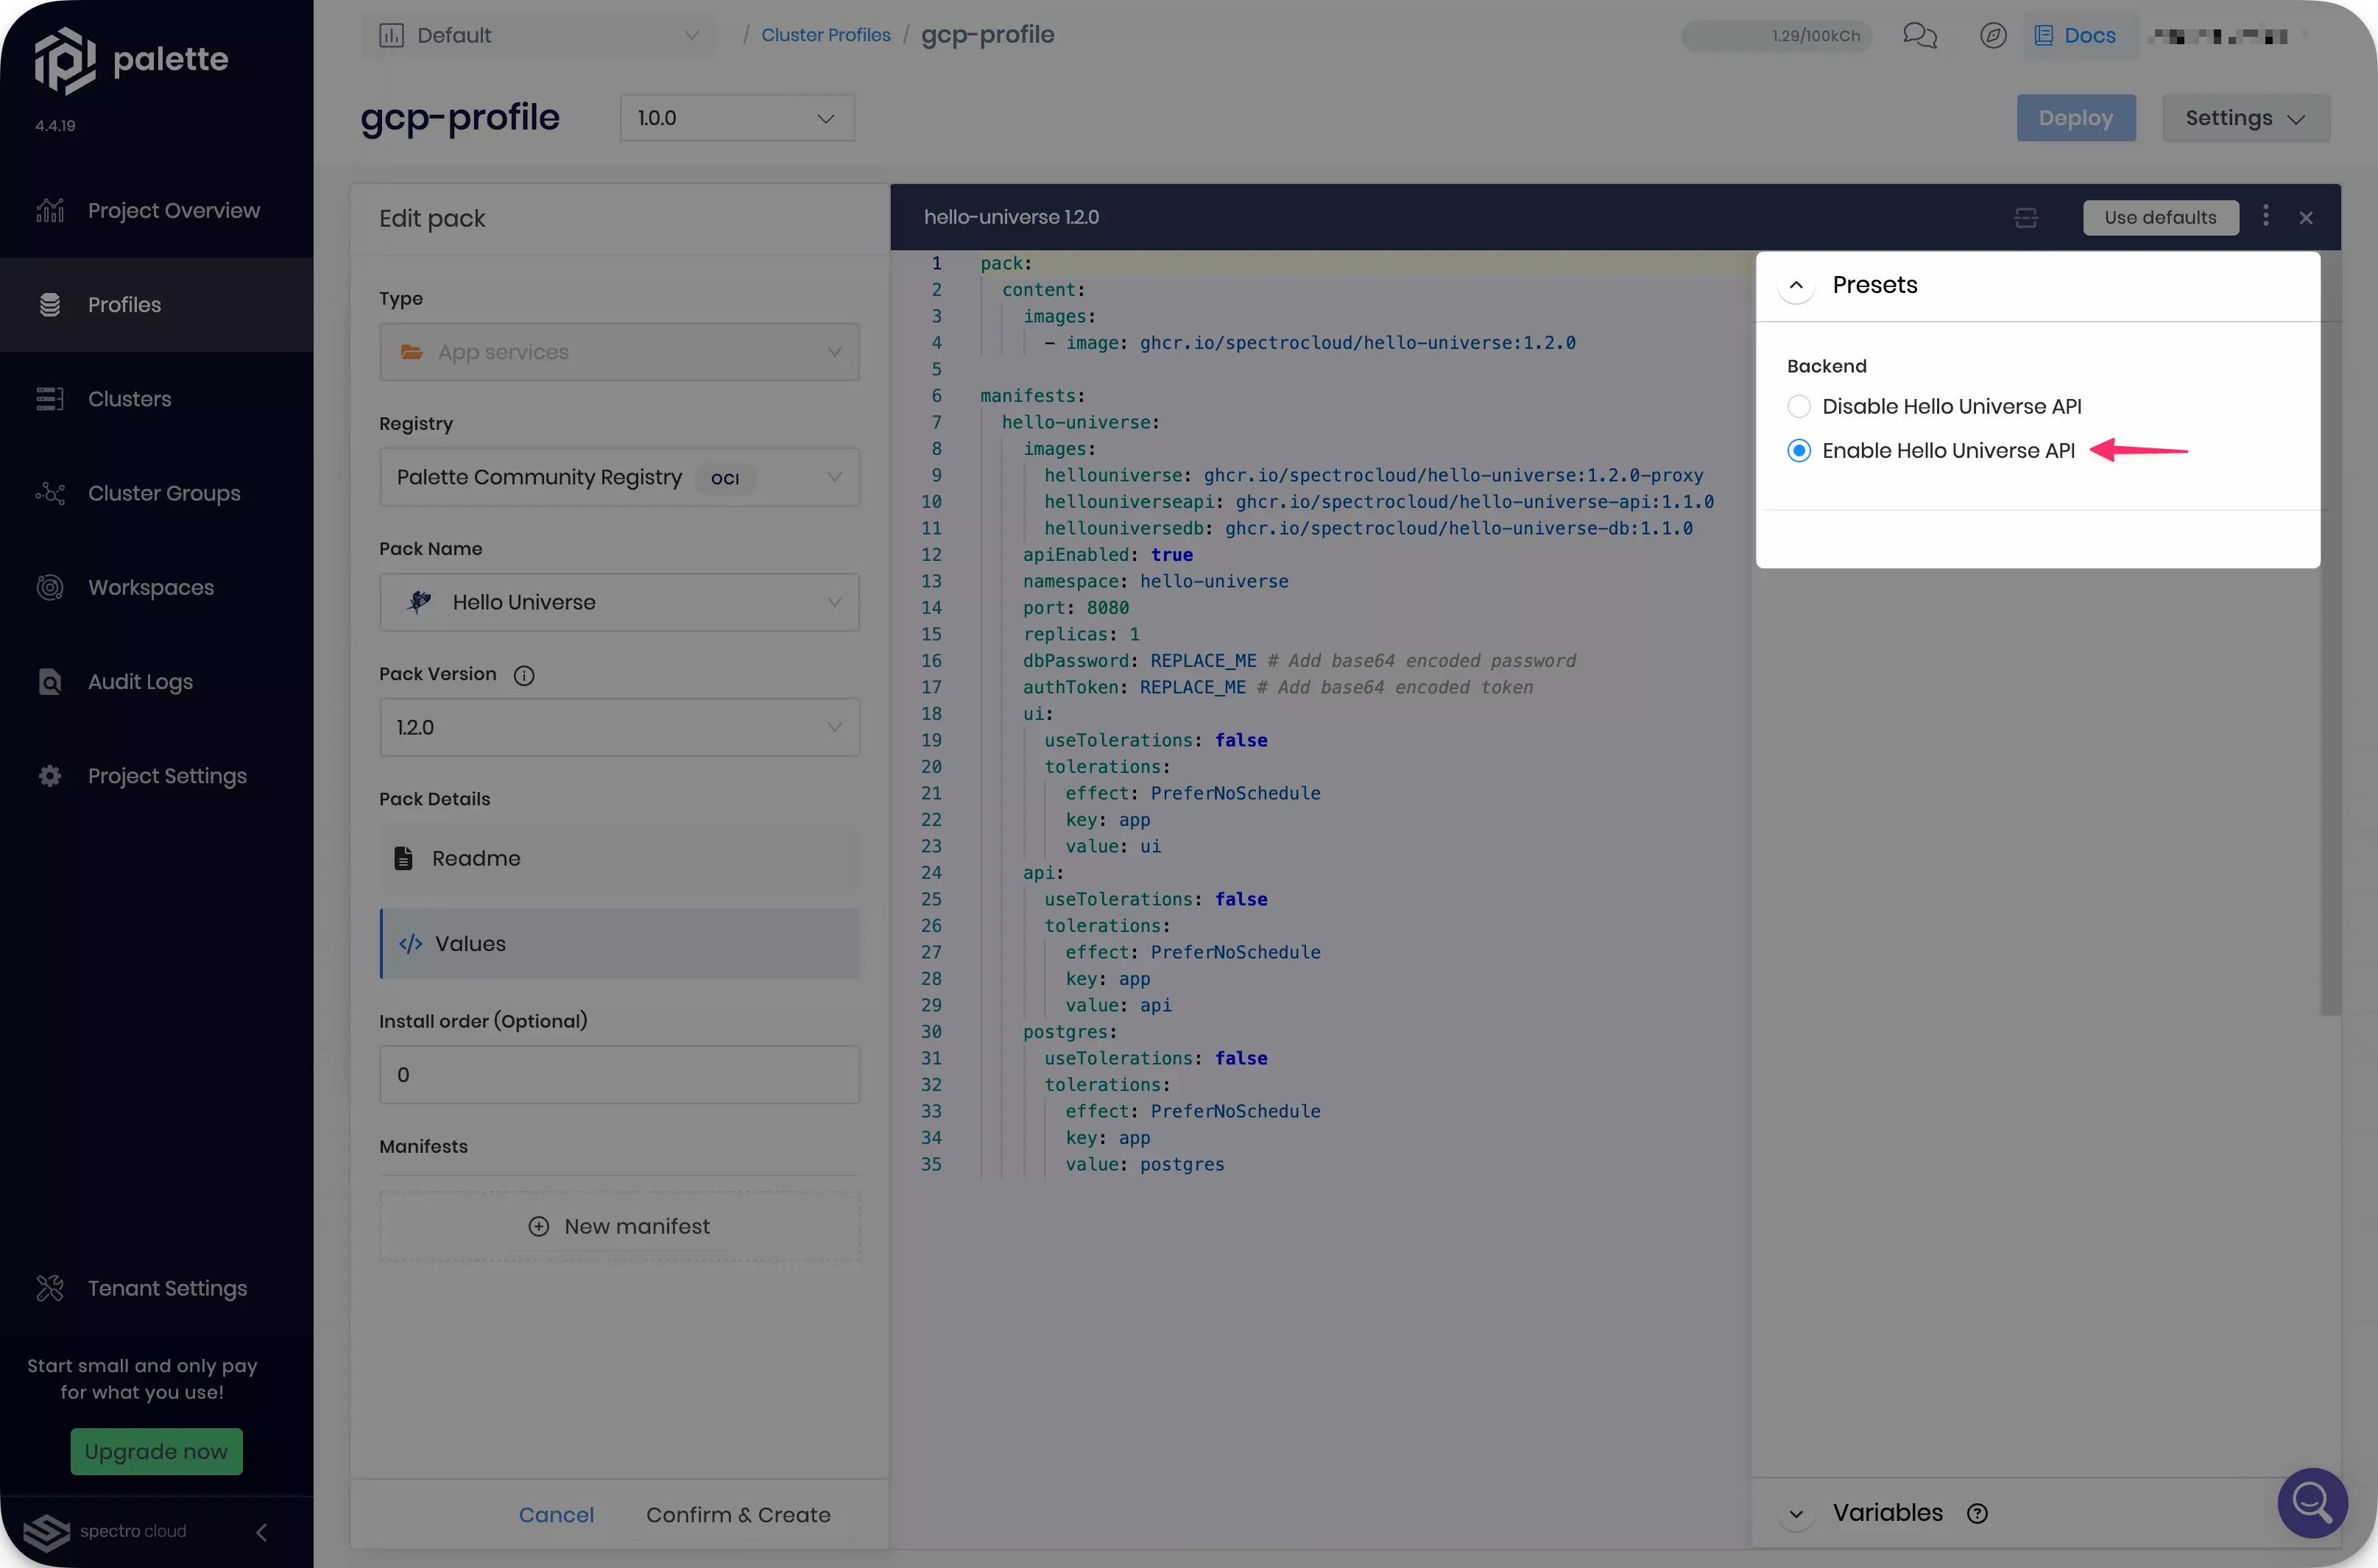
The pack requires two values to be replaced for the authorization token and for the database password when using this preset. Replace these values with your own base64 encoded values. The hello-universe repository provides a token that you can use.
Click on Confirm Updates. The manifest editor closes.
Click on Confirm & Create to save the manifest. Then, click on Save Changes to save this new layer to the cluster profile.
Wrap-Up
In this tutorial, you created a cluster profile, which is a template that contains the core layers required to deploy a host cluster using GCP. You added a community pack to your profile to deploy a custom workload.
We recommend that you continue to the Deploy a Cluster tutorial to deploy this cluster profile to a host cluster onto GCP.
🧑🚀 Catch up with Spacetastic
Wren and Kai have created their first Palette cluster profile by following the steps described in this guide. They are in good spirits, as the process has gone smoothly.
"The visual representation of cluster profiles in Palette is much clearer than our whiteboard." says Kai, glancing back at the list they have created. "I can keep track of which versions we are using in production just by reviewing the profile. What are your thoughts, Wren? Have you remained a Palette skeptic?"
Wren laughs. "Yes, I admit cluster profiles are very convenient. I'm not convinced yet, but I am already starting to understand how Palette could make us more productive. Let's keep exploring and get something deployed with it!"